Configuring Coverity
It is possible to incorporate Coverity results in the TICS output
for files.
Prerequisites
For a successful Coverity integration, the following prerequisites
must be met:
- The results must be available in the Coverity Connect viewer. TICS only retrieves the results and does not perform the analysis.
- The Coverity properties have to be configured correctly, see below.
Basic configuration
To use Coverity one has to set-up the required properties in either the SERVER.yaml to apply them for all projects or in PROJECTS.yaml to apply them project specific. If the properties are declared in the SERVER file and also in the PROJECT the project specific properties will overwrite the global properties.
Syntax
The following properties have to be declared either on SERVER or PROJECT level:
TOOLS:
  Coverity:
    WEBSERVICE:
      USERNAME: 'Login name'
      PASSWORD:PLAIN: 'Password'
      URL: 'URL of Coverity Web API, for example: https://coverity.tomtomgroup.com:443'
      [AUTHENTICATIONKEYFILE: 'The location of an authentication key generated from Coverity Connect']
      [TIMEOUT: The time a webservice call may take (in seconds) before it is aborted ]
      [NR_OF_RETRIES: The number of retries when the data cannot be fetched because of connection timeout ]
      [CONNECTION_RETRY_TIMEOUT: The time (in seconds) between retries]

  [INSTALLDIR: 'Bin directory of Coverity Analysis']
  [INTERMEDIATEDIR: 'Path to an intermediate directory that is used to store the results of the build and analysis. It can be can be used to speed up the analysis by reusing the intermediate directory Coverity generates (Refer to Coverity documentation for details)']
  COVBUILD:
    BUILDCOMMAND:['Native project build commands needed for cov-build']
    EXTRAOPTIONS:['Extra options needed for cov-build; See the Coverity documentation for details']
    [TIMEOUT: The time (in seconds) that cov-build is allowed to run before TICS terminates the call)]

  [COVANALYZE:
    EXTRAOPTIONS:['Extra options needed for cov-analyze; See the Coverity documentation for details']
    [TIMEOUT: The time (in seconds) that cov-analyze is allowed to run before TICS terminates the call]
  ]

  [COVCOMMIT:
    EXTRAOPTIONS:['Extra options needed for cov-commit; See the Coverity documentation for details.']
    [TIMEOUT: The time (in seconds) that cov-commit-defects is allowed to run before TICS terminates the call]
  ]

  [LICENSE:
       SECURITY:0|1 #Whether your Coverity license includes security analysis.
  ]

  [SHOWEXTTRACE:Shows or hides external trace information link ]
The following properties have to be applied on PROJECT level:
VIEWS:
  branch name:
    TOOLS:
      Coverity:
        PROJECT: 'Project name in Coverity'
        [STREAM: 'Stream name in Coverity']
        [TRIAGESTORE: 'Triage store name in Coverity']
        [BRANCHDIR: 'Branchdir used for the Coverity analysis']
        [DYNAMICPROJECTCREATION: 'Enables or disables dynamic Coverity project creation']
Example for BRANCHDIR:
This section will give a more detailed explanation to clarify how to define the BRANCHDIR property and why it is needed.
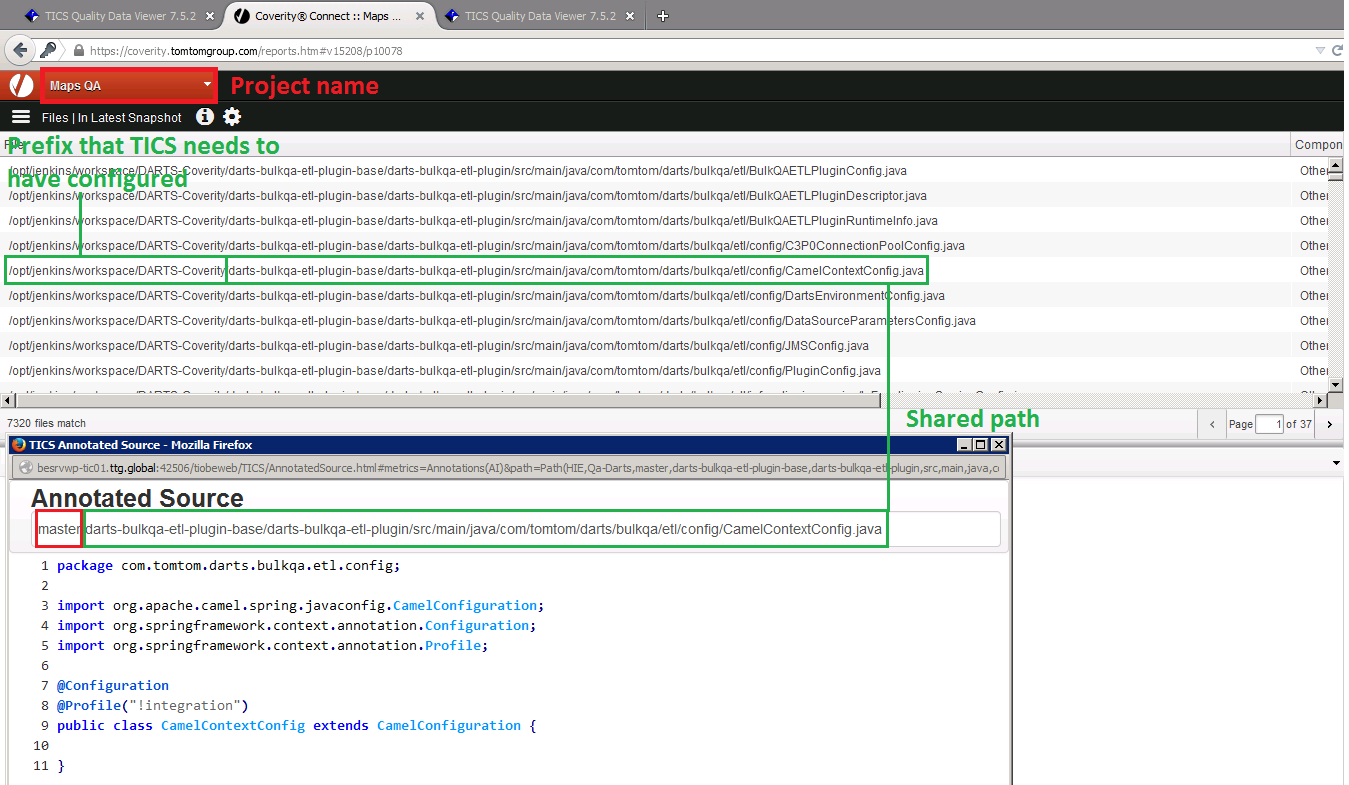
The screenshot below shows an actual live set-up where the BRANCHDIR is needed to get TICS to work with Coverity.
Now for TICS to work with Coverity it is needed to translate the relative path of TICS to the absolute path of Coverity.
As seen on the screenshot below the project name of the Coverity project is Maps QA.
The prefix that is needed to translate the path is highlighted in the Coverity path (first green box).
Note that the BRANCHNAME needs to be removed from the relative path of TICS.

The situation above requires the following set-up of properties:
VIEWS:
  master:
    TOOLS:
      Coverity:
        PROJECT:'Maps QA'
        BRANCHDIR:'/opt/jenkins/workspace/DARTS-Coverity/'
Example for BUILDCOMMAND and LICENSE:
A project can also be configured with BUILDCOMMAND, Cov-build timeout and LICENSE as follows:
VIEWS:
  master:
    TOOLS:
      Coverity:
        PROJECT:'Maps QA'
        BRANCHDIR:'/opt/jenkins/workspace/DARTS-Coverity/'
        COVBUILD:
          BUILDCOMMAND:['gradlew']
          EXTRAOPTIONS:['--instrument']
          TIMEOUT:3600
        LICENSE:
          SECURITY:1
AUTHENTICATIONKEYFILE:
A Coverity authentication key file can be used instead of a username and password by configuring the location of the file with AUTHENTICATIONKEYFILE in the SERVER.yaml/PROJECTS.yaml as follows:
  TOOLS:
    Coverity:
      WEBSERVICE:
        URL:'localhost:8080'
        AUTHENTICATIONKEYFILE:'/path/to/coverity-auth-key.txt'
Alternatively, an authentication key file named coverity-auth-key.txt can be added in the TICS configuration directory.
In that case, it is not necessary to configure the AUTHENTICATIONKEYFILE property, since TICS will find it automatically.
It is also possible to add a file with a custom name in the TICS configuration directory and configure the relative path as:
  TOOLS:
    Coverity:
      WEBSERVICE:
        URL:'localhost:8080'
        AUTHENTICATIONKEYFILE:'./custom-auth-key.txt'
Note
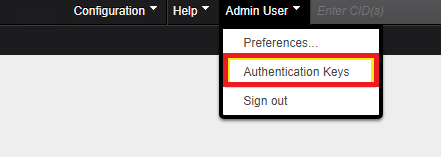
An authentication key file can be generated from Coverity Connect:

DYNAMICPROJECTCREATION:
By default, if the configured Coverity Connect project and stream do not exist,
TICS will create them. This feature can be disabled via the configuration option DYNAMICPROJECTCREATION.
  TOOLS:
    Coverity:
      PROJECT:'project_name'
      STREAM:'stream_name'
      DYNAMICPROJECTCREATION:0
SHOWEXTTRACE:
By default, the violation trace from Coverity Connect is shown in the TICS annotations.
This feature can be disabled by setting the configuration option SHOWEXTTRACE to 0.
  TOOLS:
    Coverity:
      SHOWEXTTRACE:0