TICS Viewer Configuration
This chapter explains the various configuration items for setting up and working with the TICS Viewer.
The TICS Viewer requires some bootstrap configuration to set up and get started. After you have a working TICS Viewer, it can be used to set other configuration options that further control the workings of TICSQServer and the viewer itself. We distinguish between TICSQServer and viewer configuration on one hand, and general and project-specific configuration on the other hand. The locations where the various configuration items can be found are:
- The Administration Pages in the viewer allows you to change general and project-specific viewer configuration. Below we list some of the things you can configure in the Administration Pages.
- The Build Configuration page in the viewer allows you to change project-specific configuration for both TICSQServer and the TICS Viewer. For instance, it allows you to set the source directory for a project that TICSQServer has to use during an analysis, or to set the project group to which a project belongs; information which is only used by the viewer.
- The
SERVER.txtfile contains general configuration. This configuration mostly pertains to TICSQServer, however, a notable exception is the WEBSERVER item which also has some viewer-specific configuration. - The
PROJECTS.txtfile contains project-specific configuration, mostly pertaining to TICSQServer. Some of this information can also be configured using Build Configuration, which is actually the preferred way, as it adds validation and prevents you from making mistakes. - The
TIOBEPortal.cfgfile contains bootstrap configuration that is needed to get the viewer up and running and which should be changed seldom or even never at all.
Administration Pages
This section describes some of the settings that you find in the Administration pages. To access the Administration pages, you need to be logged in and you need to have the proper permissions. If that is the case, you will find the Administration pages in the application dropdown menu in the upper-left corner.
Authentication & Authorization
Authorization allows you to control which users have access to which projects and functionalities of the viewer. Users authenticate themselves using the authentication dialog that is accessible through the padlock icon () in the upper-right corner. The viewer supports the following authentication providers:
- Simple built-in authentication provider
- LDAP (Lightweight Directory Access Protocol)
- Azure Active Directory identity provider
The simple built-in authentication provider requires an administrator to manually add each username and password to the viewer settings database. The LDAP authentication provider connects to an existing LDAP directory service running in your network, so that users can use the same credentials as they are used to. Azure Active Directory (Azure AD) is a cloud-based identity provider built and operated by Microsoft. Our authentication provider for Azure AD is currently the only one that supports multi-factor authentication and single sign-on (SSO). See the section below for more information on configuring Azure AD.
Users that log in using one of the authentication providers are automatically added to the user database when they first log in. Even when using an external authentication provider, you still might want to add built-in user accounts manually. Another good practice is to create a (backup) administrator account that can be used when you are locked out, for instance when the LDAP service is (temporarily) unavailable, or when you made a change to an LDAP query that caused you to no longer have the proper permissions.
To use the built-in authentication provider, create a user with a password in the Administration Pages → Users settings. In the user creation dialog, you can immediately choose the role that the user should receive. The user will assume this role for all projects. If this is not desired, you can choose to not assign a default role, but instead configure this using Authorization Rules, as explained below. To use LDAP authentication, create one or more LDAP Queries. A user is authenticated when it is accepted by at least one of the LDAP queries. You should create multiple LDAP queries if you want to assign different roles to different sets of users.
A role is simply a convenient name for a set of permissions. Example (built-in) roles are "Administrator", "Build Manager", and "User". Examples of permissions are the "administration" permission, which allows a user to access the Administration page and the "view project" permission, which allows a user to view metric data of a project. You can inspect or create new roles in the Administration Pages → Roles settings.
Authorization Rules
To assign roles to users, you can create authorization rules. Alternatively you can set the 'default role' for a user that is controlled by the built-in authentication provider. However, when using By default a rule exists that assigns the User role to users that are not logged in (guests). To disable guest access, you should first delete this rule and then create one or more new rules. When creating a new rule, you need to select the user scope and the project scope. The project scope determines for which projects the user receives the permissions that are associated with the role. This is only relevant for project-specific permissions, such as the "view project" and "edit project" permissions. You can leave this field empty to select all projects. For the user scope, we distinguish the following types:
GUEST: Users that are not logged in (controls guest access)USER: An explicit set of users that you need to select from a list. Note that the user has to log in first, otherwise it will not be available in the list.LDAPQUERY: An implicit set of users identified by one or more LDAP queriesGROUP: The implicit set of users that are member of the specified Azure group(s)
By default, a user that does not have access to a project gets to see a padlock icon instead of the metric value. If you want to hide the project altogether, disable the "List unauthorized projects" setting on the Miscellaneous page.
Please refer to the Administration Pages for more in-depth information.
Authentication Tokens
An authentication token is used to authorize a client process to access certain APIs,
without having to provide the username and password for an actual user.
Tokens are administered in the Administration Pages → Authentication Tokens panel.
Only users having the administration permission can create tokens.
When creating a token it is important to copy the token value immediately as it is shown only once.
Securing the private APIs of the Viewer
One purpose of authentication tokens is to protect the viewer's private APIs from unauthorized access;
only the TICS Analyzer (i.e. TICSQServer, TICSMaintenance) and TICS Build Service clients should be able to access these.
This is especially important when the viewer is exposed to an untrusted network.
After a fresh installation of the viewer (not an upgrade), you need to take the following steps to ensure that the TICS Analyzer can communicate with the viewer:
- Go to the Administration Pages → Authentication Tokens panel
- Create a token for role TICS Analyzer (be sure to copy the token before pressing Ok)
- Put the token value in SERVER.txt => WEBSERVER => AUTHTOKEN.
Alternatively, if you are sure that the viewer is in a trusted network, you can add a guest authorization rule for the role TICS Analyzer:
- Go to the Administration Pages → Authorization Rules panel
- Create a rule of type GUEST and role TICS Analyzer with global (empty) scope
When you do an upgrade of an existing viewer, such a guest rule is already created for you, so that the existing installation does not break and keeps working as before. When you want to secure the private APIs, you should remove the guest rule and create the token as described above.
When you want to want to make use of the (optional) TICS Build Service, the same steps apply,
but you should choose the role TICS Build Service for the token,
and the authentication token needs to be placed in a file named %TICS%/TICSBuildServer.properties
with the following contents:
ticsviewer.authtoken=<token value>Again alternatively, you can create a guest authorization rule for the TICS Build Service role.
Automation Scripts
Authentication tokens can also be useful when you want to write an automation script that accesses the Web API. Instead of putting your own username and password in the script, you can (have an Administrator) generate a token and use that instead.
When you obtained a token, you should make sure that the HTTP client library or command-line tool provides the HTTP basic access authentication header. Below is an example for providing a token when using the curl command-line tool to retrieve data from the Measure API:
curl -H "Authorization: Basic ZjYxNzMyZmItZGQyOC00M2VhLWI2ZjYtZGE4ODQwZjMzYmMxOntlSFxHO3o0d3QiUUJ9Ig" "http://localhost/tiobeweb/TICS/api/public/v1/Measure?metrics=tqi&filters=Project(MYPROJECT)"
Configuring Azure Active Directory
Azure Active Directory is an identity provider from Microsoft that can be used for authentication in the TICS viewer when your organization has a Microsoft Azure account (tenant). The TICS viewer does not have to run in the Azure cloud for this to work. To start using Azure AD for authentication, you need to take the following steps (see also here).
First configure the Azure side:
- Sign-in to the Azure portal
- Search for Azure Active Directory
- Select App Registrations
- Select New Registration and enter the following:
- Enter a name for the application, for instance 'TICS Viewer'
- Select an account type, typically Accounts in this organizational directory only
- Select the Redirect URI type Web
- Enter Redirect URI:
https://HOSTNAME/tiobeweb/TICS/api/public/v1/AzureAuth(URL path is case sensitive), whereHOSTNAMEis the hostname of the server through which your users will access the viewer. Azure AD requires this to be anhttpsaddress for security reasons. Note thatTICSis the name of the viewer section for which you want to configure Azure AD. The default section name is 'TICS'. If you have multiple sections configured, you need to configure multiple Redirect URI's. - Click Register
- You will be redirected to the Overview page for the newly registered 'TICS Viewer' app showing details that we need when configuring the viewer side.
- Navigate to Certificates & Secrets
- Select New client secret and add a client secret using an appropriate description and expiration time
Enabling Azure Group Membership claims is optional, but it allows the TICS Viewer to receive information about the Azure groups that a logged in user is a member of. In order to enable Group Membership claims, do the following:
- In the App Overview page, go to Manifest
- In the JSON editor, change:
"groupMembershipClaims": nullto"groupMembershipClaims": "SecurityGroup" - Click Save
After configuring the Azure portal, you need configure the Azure identity provider in the TICS Viewer:
- Sign-in to the TICS Viewer as Administrator user
- Navigate to Administration Pages → Identity Providers
- Select Add Identity Provider
- Enter as Authority URL:
https://login.microsoftonline.com/tenant_idwhere you replacetenant_idby the identifier (UUID) found next to field 'Directory (tenant) ID' on the Overview page in the Azure portal. - Enter as Application ID the identifier (UUID) found next to the field 'Application (client) ID' on the Overview page
- Enter as Client Secret the client secret value (not the ID) configured in the Azure portal.
Limitation Certificates are not yet supported.
- Click Ok
- The Authentication dialog will now contain a new button that allows you to log in using Azure Active Directory. Note that if you are already logged in, you first need to log out for the button to become visible.
Finally, you need to configure an authorization rule of type GROUP to make sure that users that authenticate using Azure will be assigned a role.
Group memberships claims are reported by Azure as a group object id (as opposed to a human-readable name).
You can create groups and find their object ids in the Azure Portal in the Azure AD → Manage → Groups panel.
If you did not configure the groupMembershipClaims option in Azure (see above), and you want to assign a role to anyone that logs in using Azure,
you need to configure an authorization rule with type GROUP for group id 69f04963-31e8-467c-9e69-43cfdf3f3651.
Custom Notifications
A notification is a message that the viewer shows in the upper-right corner to provide the user with information, or to notify the user of any problems. Different colors are used for different levels of severity:
- Informational messages are displayed in blue.
- Warnings are displayed in orange.
- Errors are displayed in red.
An example of an informational notification is when you open the Annotated Source for the Coding Standard metric and there are no issues for that metric. You will then see the following notification in the upper-right corner:
A custom notification is a message that is created by a user, rather than originating from the system itself.
Only users having the manageCustomNotifications permission can create custom notifications;
these are typically users having the 'Administrator' role,
but this can be configured.
Custom notifications are useful to broadcast messages to all users of the viewer.
An example of this is to inform users of scheduled maintenance,
or a tool that is temporarily failing, causing a drop in the TQI scores.
Custom notifications are visually distinct through the use of a hand icon ().
Custom notifications can be created in the Administration Pages → Custom Notifications panel.
Firewall
Using the firewall settings you can block access to users based on their IP address. This provides an extra layer of protection on top of the authorization mechanism described above. The firewall supports IPv4 and IPv6 addresses, black- and whitelisting, and fine control over which functionality of the viewer should be blocked.
Please refer to the Administration Pages → Firewall settings for more in-depth information.
Metric Presets
Metric presets are shortcuts to pre-configured sets of metrics. They are accessible from the Presets dropdown menu in the Explorer view. When selecting a preset in the Explorer, all existing metrics are replaced. In addition to metrics, a preset optionally sets one or more filters.
The TICS Viewer comes with a number of pre-configured metrics. You can change those or add new ones in Administration Pages → Metric Presets settings.
Quality Gates
A quality gate is a set of conditions that should hold before your software can pass to the next phase in the software development process. Each condition checks whether the current value of a metric is above or below a target threshold. An example of a condition is 'the number of Coding Standard Violations for level 1, 2, and 3 should be 0'.
You can define quality gates in the Administration Pages → Quality Gates settings.
The quality gate statuses can be seen on the TQI Dashboard when you group by project or branch. A green or red flag behind the project determines whether the project passes or fails the gate. When no gate is associated with a project, no flag is shown. When an evaluation error occurred, an orange flag is shown, urging you to check the gate configuration. By clicking on the flag a dialog opens showing the evaluation result of each condition. Clicking on a condition shows you why the condition failed (or passed).
Quality gates statuses are evaluated dynamically by the viewer and are not stored in the database. This has advantage that when you create or change a quality gate, you can immediately see it's effect; projects that previously did not have a quality gate associated it now do, and passed projects might now fail and vice versa. This allows you to adjust the quality gate definitions and see the effect immediately. This also allows you to go back in time using the time machine functionality and inspect the status when the gate was not even defined yet.
Conditions can be evaluated (checked) per project (the default) or per file. When checking per file, every individual file should pass the condition.
Conditions can be absolute (the default) or relative. An absolute condition checks whether the metric value at the current date is above or below the target threshold. A relative condition checks whether the metric has changed a certain amount with respect to a chosen reference date, or in other words, whether the delta metric value is above or below the target threshold. An example of a relative condition is 'Δ Average Code Coverage ≥ 0', which specifies that the code coverage should increase with respect to the given reference date, which is configured in the binding as explained below.
When you create a quality gate, a default binding is created that binds the gate to global project scope. This means that the gate will be checked for every project configured in the viewer. If you only want some projects to be checked by the gate, you can specify a narrower scope in the binding.
In addition to the scope, you can also specify the delta reference date in the binding. This determines for relative conditions which date should be taken to compare the metric value with. These options include picking a specific date, a specific baseline name, the last baseline, the first analysis, or the previous analysis. Note that all options reference a static point in time, except for the 'previous analysis' which is dynamic: the reference date changes with each run. This could result in an unstable quality gate status: when the gate status goes to 'failed' because a developer introduced 5 issues, it will go to 'passed' when the next commit solves 1 issue. You can still see this in the history of the status, but you must take care not to ignore this information. Therefore, we recommend using one of the static reference dates where possible, or combine the dynamic reference date with a static one by creating two bindings.
Source Code Retrieval
After each analysis, TICSQServer uploads the source files that it analyzed to the viewer and removes any previously uploaded source files. This means that old revisions of source files are not readily available to the viewer. If you want to use the 'Diff' functionality in the Annotated Source, you need to enable Source Code Retrieval to be able to see old source file revisions.
The Source Code Retrieval is opt-in; it is disabled by default. You can enable it in the Administration Pages → Source Code Retrieval settings. By default, the viewer will invoke TICSMaintenance on the Build Server (using TICS Build Service). The requirements for this default scenario are:
- Proper SCM tool configuration in TICS
- Exactly one instance of TICS Build Service that is connected with the viewer. If you have more than one build server, an arbitrary build server will be picked to invoke the command on.
If these requirements are not met, you can configure the viewer to invoke a custom command on the viewer machine to retrieve source files. For instance, to configure the viewer to use Subversion over SSH, use the following settings:
- Retrieve Old Sources
- Yes
- Execute on Viewer
- Yes
- Use Custom Command
- Yes
- Command
- svn cat svn+ssh://user@192.168.1.1/path/to/svnrepository/$file@$revision
- Environment Variables
- SVN_SSH="C:/Program Files (x86)/Putty/plink.exe" -i "C:/Program Files (x86)/Putty/privatekey.ppk"
Please refer to the Administration Pages→Source Code Retrieval settings for more in-depth information.
Configuring Sections
A default TICS installation only has one section, named TICS.
When you access the viewer, you can see the section name in your browser's address bar.
Sometimes you want to configure multiple sections, for instance, one for each business unit.
Each section is isolated from the rest in the sense that it has its own set of projects and configuration.
It is also possible for each section to run a distinct version of the viewer.
This is useful for instance when you want to upgrade to a new version, but want to assess the impact of this upgrade on your TQI score,
or first want to make sure that the new viewer is running correctly before you move it into production.
To configure a new section, you need to change the TIOBEPortal.cfg file.
This JSON file is located in the webapps directory of your Tomcat installation,
and look something likes this:
{
  "TICS": {
    "root": "C:/Program Files/TIOBE/TICS/WebServer/TICS",
    "tiobewebServlet": "tiobeweb-9.0.1.34491"
  }
}
The root key points to a directory where the viewer stores various files
such as data and settings.
The tiobewebServlet points to the name of WAR file that contains the viewer "servlet".
To create a new section, you are advised to first stop the Tomcat service.
Then, duplicate the JSON object, change both the section name and the root directory.
For instance, to create a new section "BU2" for a new business unit, the TIOBEPortal.cfg file
will look like this:
{
  "TICS": {
    "root": "C:/Program Files/TIOBE/TICS/WebServer/TICS",
    "tiobewebServlet": "tiobeweb-9.0.1.34491"
  },
  "BU2": {
    "root": "C:/Program Files/TIOBE/TICS/WebServer/BU2",
    "tiobewebServlet": "tiobeweb-9.0.1.34491"
  }
}
After saving your changes, restart Tomcat, and access the BU2 section.
You can do this by accessing your viewer's URL without a section, i.e. by accessing http://yourhostname:42506/tiobeweb.
You will get a page with a list of configured sections.
It is possible to hide certain sections from this list.
To achieve this, specify "hidden": true for the sections you want to hide from this list.
If all sections are hidden but one, you are automatically forwarded to that section.
Configuring SSL/TLS
The TICS Viewer acts as both a server and a client in several communication channels, as depicted in the diagram below.
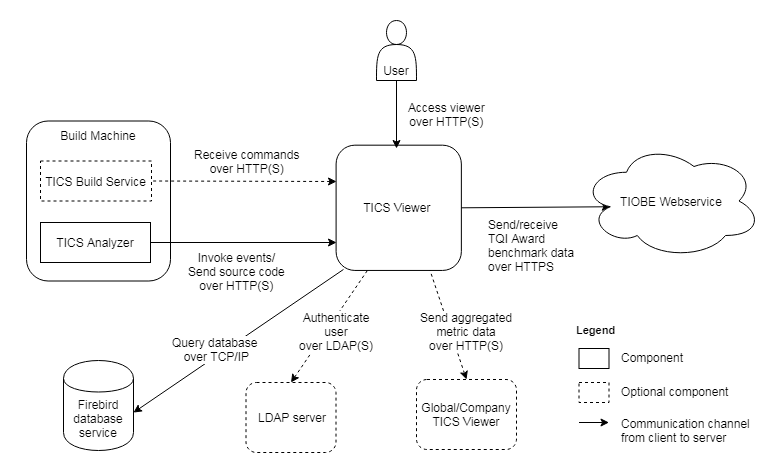
- A user accesses the TICS Viewer with a browser over HTTP(S)
- The TICS Analyzer sends events and uploads source code to the TICS Viewer over HTTP(S)
- The TICS Build Service (optional) requests to receive commands from the TICS Viewer over HTTP(S)
In order to make the the above connections secure, you need to configure server-side SSL/TLS.
The TICS Viewer acts as a client (outgoing arrows) in the following events:
- The TICS Viewer connects to an LDAP server to authenticate a user (optional). This connection is secure if the LDAP server is properly configured and you configure the viewer to use LDAPS in the Administration Pages → LDAP Queries settings. You might need to add the server-side certificate to the JRE cacerts file.
- A local TICS Viewer sends aggregated metric data to a global TICS Viewer (optional) over HTTP(S). You might need to add the server-side certificate to the JRE cacerts file.
- The TICS Viewer sends aggregated metric data to and receives anonymized TQI Award benchmark data from a web service hosted on TIOBE premises, over HTTPS. This connection is secure by default and does not need configuration.
- The TICS Viewer queries the Firebird database through TCP/IP. This connection is not secure by default, and can currently only be made secure by setting up an SSH tunnel, but we do not actively support this.
Server-side SSL/TLS
By configuring SSL/TLS you enable encrypted HTTPS communication between the TICS Viewer and its clients, such as browsers, which helps to prevent intruders from stealing sensitive data such as passwords. Because the TICS Viewer runs on Apache Tomcat, SSL/TLS can be configured through the Tomcat configuration files.
Alternatively, you can install a reverse proxy such a Nginx on a different machine or port number to encrypt traffic between the proxy and the browsers. Communication between the viewer and proxy can then remain unencrypted, so that you do not have to change the Tomcat configuration.
Server-side SSL using Tomcat configuration
To configure SSL in Tomcat, you first need to have a certificate.
You can acquire one from a certificate authority (CA), or you can generate a self-signed certificate.
In general, the downside of a self-signed certificate is that they are not trusted by default,
and explicit configuration on the client side is typically needed.
To generate a self-signed certificate, execute the following command and use changeit when prompted for the password:
"%JAVA_HOME%\bin\keytool" -genkey -alias tomcat -keyalg RSA -keystore c:/path/to/keystore.jks
Now add an HTTPS connector to conf/server.xml located in the Tomcat directory:
<Connector port="8443" protocol="org.apache.coyote.http11.Http11NioProtocol"
   maxHttpHeaderSize="8192" SSLEnabled="true"
   maxThreads="150" minSpareThreads="25"
   enableLookups="false" disableUploadTimeout="true"
   acceptCount="100" scheme="https" secure="true"
   clientAuth="false" sslProtocol="TLS" useBodyEncodingForURI="true"
   keystorePass="changeit"
   keystoreFile="c:/path/to/keystore.jks"
   />
You need to restart the Tomcat service for the changes to take effect. Afterwards, you should be able to access the viewer on HTTPS on port 8443. Note that when using a self-signed certificate, your browser will indicate that the connection is not secure, because the browser does not trust self-signed certificates. This means that the connection is encrypted, but the server cannot be authenticated.
If you want to disable HTTP access, you can remove the default HTTP connector for port 42506 that was created by the setup.
In case you migrate from a situation where the viewer was already running for some time and was accepting HTTP connections,
and you now only want to support HTTPS connections, you can forward all requests so that existing links will not be broken.
To do so, specify the redirectPort in the HTTP connector in server.xml as follows:
<Connector connectionTimeout="20000"
    port="42506"
    protocol="HTTP/1.1"
    redirectPort="8443"
    />
In conf/web.xml you have to include the following snippet inside <web-app>:
<security-constraint>
    <web-resource-collection>
        <web-resource-name>HTTPSOnly</web-resource-name>
        <url-pattern>/*</url-pattern>
    </web-resource-collection>
    <user-data-constraint>
        <transport-guarantee>CONFIDENTIAL</transport-guarantee>
    </user-data-constraint>
</security-constraint>
conf/server.xml (and perhaps conf/web.xml),
so that you can restore your configuration changes when they are overwritten by the defaults.
Client-side SSL/TLS for the TICS Viewer
In cases where the TICS Viewer acts as a client in communicating with other machines through SSL/TLS,
and in case the certificate that the server uses is not signed by a root certificate that is trusted by Java by default,
you need to add that certificate to the JRE's trust store (located in %JAVA_HOME%\lib\security\cacerts),
using the keytool command that ships with Java and is located in %JAVA_HOME%\jre\bin.
If you have a certificate file (.cer, .crt) for instance, you would run:
%JAVA_HOME%\bin\keytool -import -trustcacerts -alias "MyRootCA" -file my-certificate.crt -keystore %JAVA_HOME%\lib\security\cacerts -storepass changeit -noprompt
If you have a keystore file (.jks), you would invoke the following command:
%JAVA_HOME%\bin\keytool -importkeystore -srckeystore my-keystore.jks -destkeystore %JAVA_HOME%\lib\security\cacerts -srcstorepass changeit -deststorepass changeit -noprompt
Please refer to the documentation of keytool for more details.
The TICS viewer will pick up changes to the cacerts automatically:
you do not need to restart Tomcat.
cacerts file with the new one,
so that changes you made are not lost.
Client-side SSL/TLS for the Build Service
Each Build Server runs an executable named BuildServer.jar
(wrapped by a service executable named TICSBuildService.exe on Windows) that connects to the viewer
in order to receive commands that start a TICS analysis or change TICS configuration settings.
When the viewer is configured to use SSL, build servers might need SSL configuration as well,
depending on the type of the certificate authority (CA) that your certificate requires:
- In case the CA is known by the default Java JRE trust store, no configuration is needed.
- In case the CA is not known by the default Java JRE trust store,
you need to add it using the keytool command:
%JAVA_HOME%\bin\keytool -import -alias tics -keystore "%JAVA_HOME%\lib\security\cacerts" -file your_certificate_filename
Heads up! The TICS setup sometimes updates the JRE that ships with TICS, but it will take care to merge the existingcacertsfile with the new one, so that changes you made are not lost. - In case you want to use a self-signed certificate, no configuration is needed because self-signed certificates are trusted by default (starting from version 2019.1).
With respect to SSL/TLS, the Build Server offers the following configuration options that should be put in a file named
TICSBuildServer.properties next to the BuildServer.jar file or in the directory pointed to by
the TICS environment variable:
- Self-signed certificates allow an encrypted connection, but they do not permit the client to authenticate the server, and are therefore less secure.
To not trust self-signed certificates, use the following option:
com.tiobe.httpclient.trust_self_signed_certificates = false
- SSL Host Name Verification is enabled by default.
This can be disabled by using the following option:
com.tiobe.httpclient.hostname_verification = false
After each configuration change, please make sure to restart the service.
Proxy Server Configuration
It is possible that your (company) network uses a proxy to (limit) access (to) certain websites.
The TICS executables (TICS, TICSQServer, TICSMaintenance) communicate with the viewer via HTTP(S). In case the viewer is only accessible via a proxy, the proxy settings should be propagated to the TICS executables.
You can use the *_proxy environment variables to specify the proxy settings for TICS, e.g.,
http_proxy=http://127.0.0.1:8989
https_proxy=http://127.0.0.1:8989
If (for example) http_proxy is set in the environment TICS is running in, then these settings will be used by the TICS executables when communicating with the viewer.
Note that it is also possible to specify the username and password authentication in the value of the http_proxy.
http_proxy=http://username:password@127.0.0.1:8989
Be sure to URL encode both username and password.
Configuring a Global TICS Viewer
A common scenario is to have one TICS Viewer per site within your company.
Another scenario is that you have one TICS Viewer with multiple sections.
In both cases, if you want to get an overall TQI score over all sections and sites, you need to set up a "global": true in the TIOBEPortal.cfg, as follows:
  "global": {
    "root": "C:/Program Files/TIOBE/TICS/WebServer/Global",
    "tiobewebServlet": "tiobeweb-9.0.1.34491",
    "global": true
  }
Note that the name of the section can be chosen freely and does not need to be global.
Next, you need to point each regular 'local' viewer/section to the newly created global viewer/section. To this end, navigate to the Administration pages of each local viewer, click on the Miscellaneous tab, and enter the global viewer's URL, including the section in the Global Viewer URL input field. After you save the settings, the project data is sent from the local to the global viewer and the projects should appear automatically. The global viewer is automatically updated each time you add or remove a project or perform an analysis in a local viewer.
Compatibility
Configuring a viewer as a global viewer is supported starting from version 9.1. Configuring a viewer as a local viewer is supported starting from version 8.8. It is possible to have local viewers that are of a different version than the global viewer, however, the global viewer's version should (in general) be higher than all of the local viewer's versions.